Resources
Collecting Data
The slides on this page describe the process of downloading, filling out and submitting the City Census form using the CCA Mobile app.
Note that only the users with the following designations can upload submissions using the CCA Mobile app:
- All active Admin users with the Send Data role set.
- All active users with the CollectR or XCollect designations if the form is not assigned to a team.
- All active users with the CollectR or XCollect designations that belong to a team if the form is assigned to one.
See Manage Users for more information on user privileges, roles and team assignment. Also see Manage Forms for information on restricting form access to members of a specific team.
Slide 1

(1) Click on the CCA Mobile app on your Android device.
(2) On the home screen shown above click on the Settings button.
(3) Continue on the next slide.
Slide 2

(1) On the settings page ensure that the user name and password are set to the corresponding credentials sent to your email address or passed to you by your organization’s administrator if your designation is XCollect.
(2) Ensure that the value in the Domain Name text box is ingress.ccasystem.io
(3) Click the back button and go to the next slide.
Slide 3

(1) On the home screen (See photo in Slide 1) click the Forms button.
(2) With the device connected to the Internet, click on the button shown above to retrieve active forms from the server.
(3) Select the City Census form from the list of forms returned.
(4) Click on the download icon at the bottom of the screen.
(5) Click on the City Census form in the form list shown.
(6) Continue on the next slide.
Slide 4

(1) Swipe left to begin to fill the form.
(2) Continue on the next slide.
Slide 5

Recall that this form was designed to display instructions in English or French depending on the settings of the Android device. The image above shows what the data collector will see if the device language is set to English on the left or French on the right.
Select an option and swipe left to the next form screen.
Continue on the next slide.
Slide 6

Observe that the list of countries displayed above correspond to the value selected in the screen shown in Slide 6. Swipe right to go back to the previous screen and select another continent and then swipe left to see the new set of country names displayed. Recall that the screen shown above is of type Cascade meaning its display option values depend on the value selected in the Cascade reference screen.
Swipe left and go to the next slide.
Slide 7

If you swipe left on the screen above without entering a value an Invalid Input message is displayed. The reason for this is that during the definition of the form we checked the Input Required box to ensure that the data collector is forced to enter values for each input. Type in the name of the city and swipe left to the next screen.
Continue on the next slide.
Slide 8

In this input screen enter a value less than zero and swipe left. That is right: An Invalid Input message is displayed. This is as a result of setting the minimum acceptable value to zero when this input screen was being defined in the form. Enter a valid value and swipe left.
Continue on the next slide.
Slide 9

Enter a valid value and swipe left.
Continue on the next slide.
Slide 10

Enter a valid value and swipe left.
Continue on the next slide.
Slide 11

In the screen above click on the Get New Location icon to get the GPS data of your present location. Note that it is important to tell the data collectors to stand where they can see the clear skies above. This will improve the ability of the devices to read the signals from the GPS satellites. Given the constraint placed on this input, only readings with an accuracy of 5 meters or less will be considered as valid inputs.
Swipe left.
Continue on the next slide.
Slide 12

A data collector can now save the form. If the collector wishes to fill another form he or she should click on the Save and Continue button, otherwise click on the Save and Exit button. Note that the form name is optional.
Slide 13
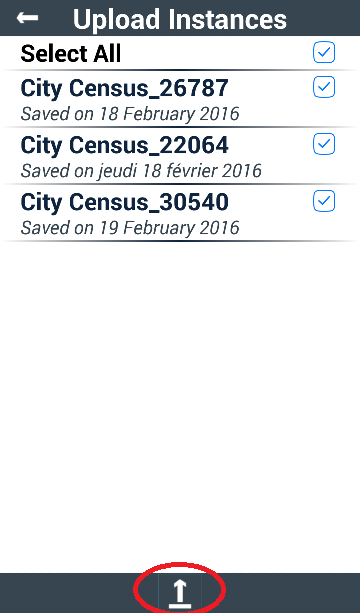
If the user is done collecting data and if the user is in a location where there is a data connection the user can follow the steps below to submit the data to the server.
(1) On the home screen click the Upload button.
(2) Click on the City Census form in the list of forms displayed.
(3) Select all the forms you’d like to submit.
(4) Click on the Upload button at the bottom of the screen. This button is circled in the image above.
This lesson is now complete. For more information on how to delete forms, view completed or incomplete forms on the Android device see these FAQs